Laravelでは通知メールを日本語カスタマイズするには、Notificationsを使います。
「元々のメールを上書きすれば良い」と思いますが、Laravelでは、これができないのです。
Laravelの仕組みと共に、Notificationsを使った通知メールのカスタマイズ方法を解説します。
認証メールを送信する方法は、下記をご覧ください。
新規登録時のメールをNotificationsで日本語カスタマイズ
まずはnotificationsの作成方法から紹介していきます。
後半で、Laravelの仕組みを解説します。
新規notifications作成
php artisan make:notification を実行して、新規notificationsを作成しましょう。
php artisan make:notification CustomVerifyEmail
名前はなんでもよいのですが、認証メールをカスタマイズするので、「CustomeVerifyEmail」としておきます。
実行後、app/Notifications の下に、新たなnotificationファイルができます。
Userモデルで通知メールのカスタマイズを宣言
Userモデルに下記をいれておきます。
    public function sendEmailVerificationNotification(){
        $this->notify(new \App\Notifications\CustomVerifyEmail());
    }
「これからはカスタマイズした通知を使ってね」という意味のコードになります。
SendEmailVerificationNotificationは、新規登録時に送信されるメールに関するメソッドです。
Notificationsファイルを編集
app/Notifications にできた CustomVerifyEmailファイルを編集します。
私はオリジナルの通知ファイルをコピペしてから変更しました。
新規登録時用の通知ファイルは、下記にあります。
私のファイルは下記の通り。
<?php

namespace App\Notifications;

use Illuminate\Bus\Queueable;
use Illuminate\Contracts\Queue\ShouldQueue;
use Illuminate\Notifications\Messages\MailMessage;
use Illuminate\Notifications\Notification;
use Illuminate\Support\Carbon;
use Illuminate\Support\Facades\Config;
use Illuminate\Support\Facades\Lang;
use Illuminate\Support\Facades\URL;

class CustomVerifyEmail extends Notification
{
    use Queueable;

    /**
     * Create a new notification instance.
     *
     * @return void
     */
    public static $toMailCallback;
    public function __construct()
    {

    }

    /**
     * Get the notification's delivery channels.
     *
     * @param  mixed  $notifiable
     * @return array
     */
    public function via($notifiable)
    {
        return ['mail'];
    }

    /**
     * Get the mail representation of the notification.
     *
     * @param  mixed  $notifiable
     * @return \Illuminate\Notifications\Messages\MailMessage
     */
    public function toMail($notifiable)
    {
        $verificationUrl = $this->verificationUrl($notifiable);

        if (static::$toMailCallback) {
            return call_user_func(static::$toMailCallback, $notifiable, $verificationUrl);
        }

        return (new MailMessage)
            ->subject(Lang::get('メールアドレスを確認します♪'))
            ->line(Lang::get('この下のボタンをクリックしてね。'))
            ->action(Lang::get('メールアドレス確認ボタン'), $verificationUrl)
            ->line(Lang::get('身に覚えがないなら、何もしないで!'));
    }

    /**
     * Get the verification URL for the given notifiable.
     *
     * @param  mixed  $notifiable
     * @return string
     */
    protected function verificationUrl($notifiable)
    {
        return URL::temporarySignedRoute(
            'verification.verify',
            Carbon::now()->addMinutes(Config::get('auth.verification.expire', 60)),
            [
                'id' => $notifiable->getKey(),
                'hash' => sha1($notifiable->getEmailForVerification()),
            ]
        );
    }

        /**
     * Set a callback that should be used when building the notification mail message.
     *
     * @param  \Closure  $callback
     * @return void
     */
    public static function toMailUsing($callback)
    {
        static::$toMailCallback = $callback;
    }
}
どのようにコピペ・編集したかは、下記をご覧ください。
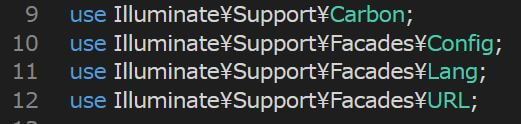
①必要なuseを追加
元々の新規登録時用の通知ファイルから、必要なuse宣言をコピペします。
②toMailCallbackを定義
これを入れないとエラーになってしまいます。

③適当に翻訳
下記のように適当に翻訳をしました。

④verificationUrlを定義した部分などもコピペ
元々の通知には、送信後、60分だけ有効な【メール確認ボタン】があります。
この機能を使うには、verificationUrlに関するコードも、マルっとコピペしておきましょう。
メール送信テストを実施
それでは、どのようなメールが送信されるかチェックしてみます。
新規登録を行うと、次のようなメールが送信されました。
【件名】

【メール本文】
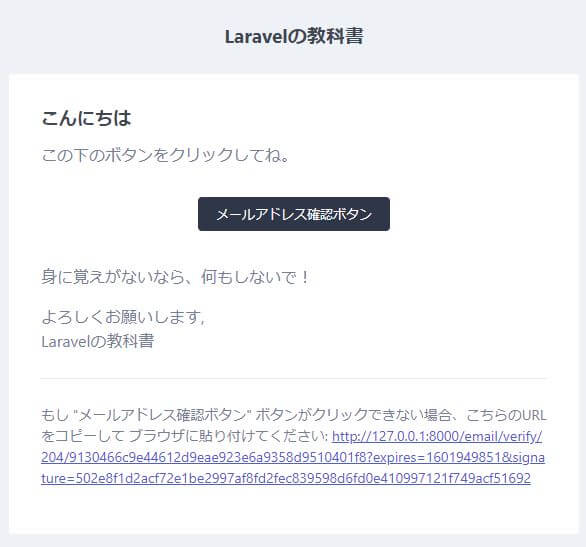
ちゃんと送られました。
かなりふざけた文面なので、適当にアレンジしてくださいね^^;
なお、「こんにちは」や、「よろしくお願いします」は、すべての通知に共通のテンプレートメールを使っています。
メールのテンプレート部分を日本語化する方法は、下記をご覧ください。
なぜ元々の通知メールを上書きしてカスタマイズできないのか
最後になぜ通知メールを上書きできないのか、Laravelの仕組みを解説しますね。
仕組みが分かっていると、色々な応用がしやすくなりますので。
通知メールは、Laravelプロジェクト直下の「vendor」フォルダの中に入っています。
先ほども書いた通り、新規登録時のメールは、下記にあります。
ですがVendorフォルダの中のファイルを上書きはできません。
デフォルトの内容を変えたければ、今回行ったような形でオーバーライドします。
Vendorフォルダの中はVisual Studio Codeなどの通常の全検索の対象から外されてしまいます。検索するには、grep検索を使う必要があります。
コメント